
I only have US keyboards but sometime I need to write in German. The German alphabet has some more letters like ä ö ü for example. Wikipedia has some information on the Umlauts.
In the past I use the Windows (only works on MS Windows) Alt Key Codes like this:
| Ä | ALT+0196 |
|---|---|
| ä | ALT+0228 |
| Ö | ALT+0214 |
| ö | ALT+0246 |
| Ü | ALT+0220 |
| ü | ALT+0252 |
| ß | ALT+0223 |
| € | ALT+0128 |
This works very good but I wanted to just have to press a key or two and not to remember a code. I found V-USB project on the web and I still had some old AVR AT90S2313-10PI at home. I used the HID Key reference project to develop my little keyboard. I had to change the code to not just send one key if pressed but hold ALT down and send 4 other keys. The code uses nearly all the flash of the 2313 so if you want to add more keys or larger commands I suggest to use a AVR with more flash. I think this would also make a good macro keyboard for games. This hardware can send key strokes just like a keyboard and it should work with any application.
Fist I started to put all on a breadboard and got it to work, the only challenge I had was I forgot about the reset 10k resistor to start it up 🙂 
After everything worked on the breadboard I decided I liked it and wanted to make it more permanent installation. I use this version for a long time…
… until I decided I want to try out CiKad to create a real PCB made by BatchPCB:

I added all the part to the schematic editor and connected all the lines, I used the soldered breadboard as a reference. There is one more program not shown here where I had to assign the form factor to all the part.

The auto route feature worked OK and I only had to change very little to get how I wanted it. Now I created a Gerber files like this:

I used my laser printer to print out the Gerber files and made sure all the parts would fit by just laying the part on the sheet of paper.
Here is a parts list:
C1 10uF
C2,3 15pF
D1 D4 LED
D2,3 1N4148
IC1 AT90S2313 or ATTINY2313
J1 USB_1
J2 ISP-6
R1,6 320 R
R2 1.5K R
R3,4 68 R
R5 10K R
SW1-5 SW_PUSH
X1 12 Mhz

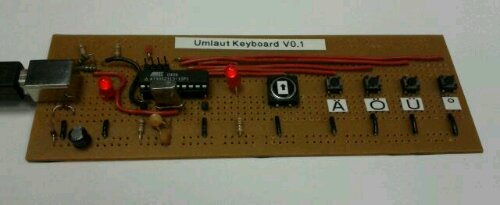
The green LED is always on if USB has power and the yellow LED is controlled by the micro controller: it flashes quickly if a key is sent and it blinks slowly all the time.
The most left key is the shift key and the next 4 keys are ä, ö, ü and the ° symbol if you hold shift you get Ä, Ö ,Ü and ß.
Please download all the source code and schematics (KiCad project) and Gerber file from here: Umlaut_Keyboard_V0.2.tar
You can also find the PCB on the BatchPCB web page.
I dont want to ruin the fun, but you will type much faster if you map the letters to its original fysical place but access them with alt gr like they do with the polish keyboard layout. I use the same trick with Swedish letters. But its a nice build.
Not polish keyboard layout, I mean Polish programmer keyboard layout.
Yes, this was more a academic exercise in PCB making… nowadays I use Linux anyway and I have just two keyboard layouts I switch if needed.
Moin,
habe mir das ganze auf Lochraster aufgebaut.
Lediglich die Dioden verwurstelung mit einem LT1117-3V3 Regler ersetzt.
Wenn ich das ganze an meinen XP-Rechner anschliesse erkennt der auch eine HID-Tastatur.
Drücke ich ein paar Tasten blinkt leider nur die LED entsprechend jedoch kommt nichts am PC an.
Bitte ein paar Tips wo ich den Fehler suchen muss.
Sorry, für die späte Antwort! Ich schaue nicht so oft auf meine Seite.
Ich hatte damals diese Webseite/Projekt als Hilfe verwendet.
https://www.obdev.at/products/vusb/hidkeys.html
Ich wolle einfach mal KiCad ausprobieren und daher hatte ich das original Projekt ein bisschen abgewandelt. Aber ich glaube diese Dioden sind schon wichtig, aber ehrlich gesagt fehlt mir das genaue wissen. Ist das ein normal USB 2 oder 1 Port?
thank you for this i want to build hard ware just like this/
I’m a noob here, where is the code that sends the keystroke to the OS how or where do you manage that?
There is a tar file download on this page with all the souce files… however, if you want a quick start I would suggest to search for ‘arduino hid keyboard’ on your favorite search engine.
Important article right here and thank you for this i want to build hard ware just like this, can i share it?